Getting Started Guide
Specs Panel
Judge Panel
Standings Panel
Reports Panel
Recording Jump Results
Entry Results Recap Screen
Top 3 Panel
Command Line Functions
Scoreboard Screen
Quick Results Entry Dialog
Settings Screen
About Dialog
Running Multiple Cards
Using the Stagger Viewer
Tips for Using a Number Pad
Calculating Championship Points
Working with JJD Files
Interfacing with Farmtek Timer
Interfacing with Show Management Systems for Entry Information
Course Time Calculator
Posting Results to the Internet
Emailing Class Results
Playing with
our Test Data
Computer Failure Recovery
Frequently Asked Questions (FAQ)
Here is a link to an overview video that will give you a very good idea
of how JJD works.
Overview Video
JJD does not require access to the internet to be used, but if you can connect to the internet from the judge's booth, you will have access to additional features in JJD. You may encounter wired or wireless internet access as some of the bigger shows but if not, you may be able to use your mobile phone as an internet hotspot. Check with your mobile operator to see if this option is available in your data plan.
With internet access you will be able to post reports to the web, update the "On Course" web page to show jump-by-jump results as you judge a round, and if the show uses ShowGroundsLive or ShowManagementSystem, you'll be able to access class entry lists from either of those systems. In addition, JJD will perform a continuous backup of the class scoresheet to a cloud storage location on the Equussentials.com web site. These backups can be accessed here used in the unlikely event of a computer failure.

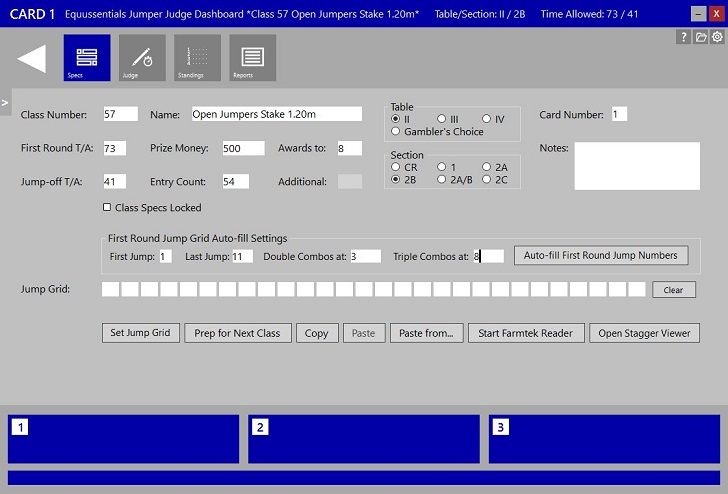
The Specs panel is where you set the specifications for the class to be judged. The above sample screenshot shows a class being set up. This class has jumps 1 through 11 in the first round and includes a double combination at 3 and a triple combination at 8. You can see how the First Round Jump Grid Auto-fill Settings can be used to quickly fill the jump grid with jump numbers for the first round. The above screen shot shows the screen before the Auto-fill button has been clicked. After clicking the Auto-fill button, if the class has a jump-off, you would then enter the jump numbers for the jump-off, then click the Set Jump Grid button. The below sample screenshot shows the class with all the specifications set.
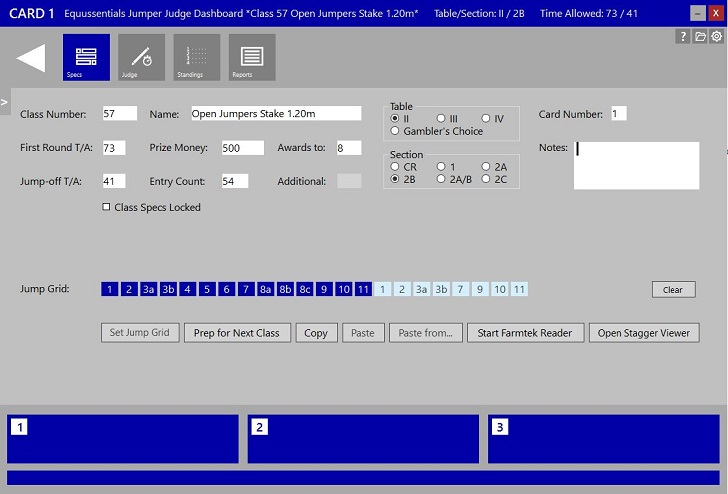
Here are the descriptions of the items on the Specs panel. Click here to watch the related instructional video.
| Item Name | Item Description |
|---|---|
| Class Number | Enter the number for the class to be judged. |
| Name | Enter the class name. |
| First Round T/A | Enter the time allowed for the first round. |
| Jump-off T/A | Enter the time allowed for the jump-off round, if applicable. |
| Prize Money | Enter the amount of the prize money offered. |
| Awards to | Enter the number of entries the prize money is distributed to based on the prize list. |
| Entry Count | Enter the number of entries entered in the class. |
| Additional | JJD will calculate the additional number of entries to pay the prize money to based on the entry count. |
| Table | Select Table II, III, IV or Gambler's Choice. NOTE: To use JJD in a limited capacity for a hunter or equitation class, hold the Ctrl key while selecting Gambler's Choice. See more info here. |
| Section | Select Section 1, 2A, 2B, 2C, or 2D. For a 2A/B class, select either 2B. |
| Card Number | Enter the card number for the class. This value shows in the JJD title bar. |
| Class Notes | Enter any class notes you wish to capture. |
| Class Specs Locked | Check to lock the class specifications to protect against accidental changes. |
| First Round Jump Grid Auto-fill Settings | |
| First Jump | Enter the number for the first jump in the first round (defaults to 1). |
| Last Jump | Enter the number for the last jump in the first round. |
| Double Combos at | Enter the numbers where double combinations occur (space between numbers). Leave blank if there are no double combinations. |
| Triple Combos at | Enter the numbers where triple combinations occur (space between numbers). Leave blank if there are no triple combinations. |
| Auto-fill First Round Jump Numbers | Click this button to auto-fill the first round jump numbers, then enter the jump-off numbers. |
| Jump Grid | Enter the jump numbers for the first round followed by the jump numbers for the jump-off round. You can specify the first round jumps using the Auto-fill functionality. |
| Set Jump Grid button | Click this button to set the jump grid after entering all the jump numbers ("set" from the command line). |
| Prep for Next Class button | Click this button when you're ready to set up JJD to judge the next class ("pr" from the command line). |
| Copy button | Copy the class specs for this class to the clipboard (used when running multiple cards). JJD will offer to open a new instance of JJD so you can paste in the specs. |
| Paste button | Paste the class specs in from the clipboard. |
| Paste from button | Paste the class specs from a previously judged class ("pf" from the command line). |
| Start Farmtek Reader button | Start the Farmtek Reader application to interface with the Farmtek timing system. See this topic for more information. |
| Open Stagger Viewer button | Click this button to open the stagger viewer window so you can always have a view of your stagger ("st" from the command line). |
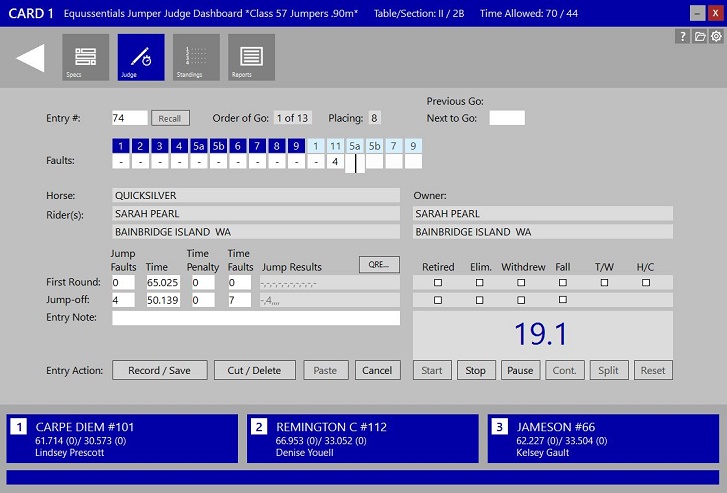
The Judge panel is where you capture the results for a given horse and rider in a class. Here are descriptions of the items on the Judge panel. Click here to watch the related instructional video.
| Item Name | Item Description |
|---|---|
| Entry # | Enter the exhibitor's entry number. |
| Faults | This is option 1 for capturing jump results - jump by jump. Enter the faults at the jump where they occur. Press the Ctrl key to indicate a refusal. Just press the enter key to indicate a clean jump. See this topic for more information on recording jump results. |
| QRE button | This is option 2 for capturing jump results - quick results entry. Click this button to bring up the Quick Results Entry button where you can use a simple dialog to enter the exhibitor's results. |
| Horse/Rider/Owner Information | This data will be displayed if you've setup an interface to information from the show management system. See the Settings dialog for more information. |
| Horse | The name of the horse is displayed here. |
| Rider(s) | The name of the rider is displayed here. |
| Owner | The name of the horse owner is displayed here. |
| Jump Faults | The total jump faults are calculated and displayed here for both rounds. |
| Time Faults | The total time faults are calculated and displayed here for both rounds. |
| Time | The time for each round is entered here. If you're using the Farmtek interface, the times will come in from the timing equipment automatically. |
| Time Penalty | The time penalty for each round is entered here. |
| Jump Fault Details | The jump faults details are displayed here for both rounds. |
| Retired checkbox | Check this option if the exhibitor retires in either round. |
| Eliminated checkbox | Check this option if the exhibitor is eliminted in either round. |
| Withdrew checkbox | Check this option if the exhibitor withdraws/scratches from either round. |
| Fall checkbox | Check this option if the exhibitor fell off their mount in either round. |
| T/W checkbox (first round only) | Check this option if the exhibitor performs a timer walk in the first round. |
| H/C checkbox (first round only) | Check this option if the exhibitor has a hors concours round. |
| Entry Notes | Enter notes for an entry here. |
| Record / Save button | Click this button to record the exhibitors results. |
| Cut / Delete button | Click this button to copy a entry's data to the clipboard then delete and entry's data from a class. You can then paste the data onto another card. |
| Paste button | Click this button to paste a entry's data from the clipboard after you just cut/delete the data from another card. |
| Cancel button | Click this button to cancel any changes you've made and to prepare the screen to judge a new round. |
| Stopwatch buttons | The use of the built-in stopwatch is optional, but can be utilized as a backup
timing device in place of a handheld stopwatch. Note: When hooked up to the FarmTek timing device, the time displayed here does not represent the running time from the FarmTek device. This is only your backup time. |
| Start | Click this button or press F1 to start the stopwatch. With a number pad, press Ctrl 1. |
| Stop | Click this button or press F2 to stop the stopwatch. With a number pad, press Ctrl 2. |
| Pause | Click this button or press F3 or * to pause the stopwatch. With a number pad, press Ctrl 3. |
| Cont. | Click this button or press F1 to continue the stopwatch after a pause. With a number pad, press Ctrl 1. |
| Split | Click this button or press F4 or / to capture a first round time and continue timing for the jump-off of a section 2C Power & Speed class (Split and Go). With a number pad, press Ctrl 4. |
| Reset | Click this button or press F5 to reset the stopwatch. With a number pad, press Ctrl 5 or Clear. |
| 45 second clock | This is only visible if you've checked the Use 45 Second Clock option on the Settings dialog. |
| Start | Click this button to start the 45 second countdown. |
| Pause | Click this button to pause the 45 second countdown. |
| Cont. | Click this button to continue the 45 second countdown after pausing it. |
| Reset | Click this button to reset the 45 second clock. |
JJD can be used in a limited capacity for a hunter or equitation class. On the Specs panel, hold the Ctrl key and select Gambler's Choice as the Table. Then on the Judge panel, enter the score for an entry in the first jump results field. This value will be saved as the total score for the entry.
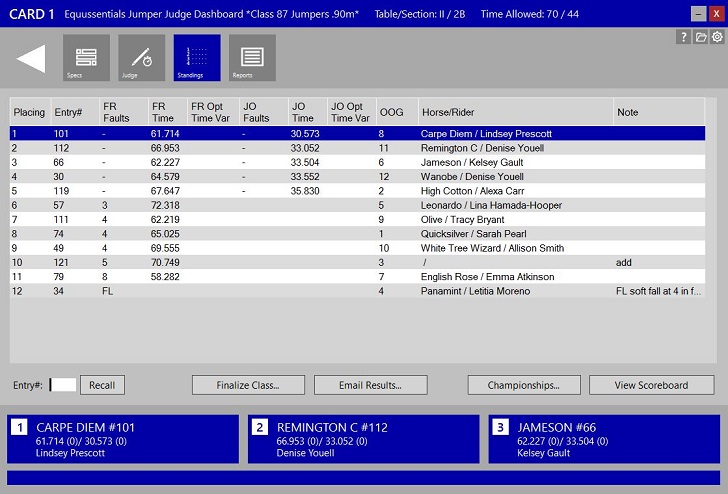
The Standings panel is where you can view the current standings of a class. This panel replaces a manually-kept stagger sheet. You can also recall an entry's results to make updates or to record their jump-off round. Here are descriptions of the items on the Standings panel. Click here to watch the related instructional video.
| Item Name | Item Description |
|---|---|
| Standings Columns | |
| Placing | This is the exhibitor's current placing in the class and is the default sort order for the data. |
| Entry# | This is the exhibitor's entry number. |
| FR Faults | This is the exhibitor's first round fault total. |
| FR Time | This is the exhibitor's first round time. |
| FR Opt Time Var | This is the exhibitor's first round optimum time variance (for Table IV classes). |
| JO Faults | This is the exhibitor's jump-off fault total.. |
| JO Time | This is the exhibitor's jump-off time. |
| JO Opt Time Var | This is the exhibitor's jump-off optimum time variance (for Table IV classes). |
| OOG | This was the exhibitor's order of go. You can sort the data by this column. |
| Horse/Rider | This is the horse and rider's name. You can sort the data by this column. |
| Note | This is the note for the exhibitor. |
| Entry# | Enter an entry number here to recall the data to make updates or record the jump-off results, then click the Recall button. You can also double-click any row in the standings to recall an entry. |
| Recall button | Click this button to recall the entry's results to be updated ("re" from the command line). |
| Finalize Class button | Click this button to finalize the class results("fi" from the command line). |
| Email Results button | Click this button to prepare the class results email to send to recipients specified on the Settings dialog ("em" from the command line). |
| Championships button | Click this button to open the dialog to calculate championship points from a set of classes in a division ("ch" from the command line). |
| View Scoreboard button | Click this button to view the Scoreboard screen. Ctrl-F8 is the keyboard shortcut ("sb" from the command line). To view an alternative, simpler scoreboard, hold the Ctrl key when clicking this button. |
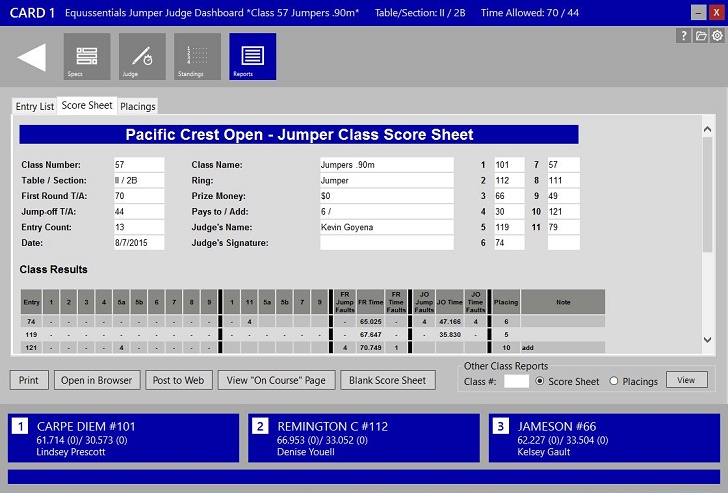
The Reports panel is where you can view and/or print the score sheet and placings report or view the class entry list. You can also post either report to the internet. Here are descriptions of the items on the Reports panel. Click here to watch the related instructional video.
| Item Name | Item Description |
|---|---|
| Entry List tab | Then class entry list is viewed on this tab if you have an interface to a show management system that provides class list details. |
| Score Sheet tab | The score sheet is viewed on this tab. The entries are listed in order of go. |
| Placings tab | The placings report is viewed on this tab. The entires are listed in placing order starting with first place. |
| Print button | Click this button to invoke the Print dialog to print the report that is being viewed. |
| Open in Browser button | Click this button to view the report in your internet browser application. |
| Post to Web button | Click this button to post the report to the internet (more information here, "po ss" or "po pl" from the command line). |
| Blank Score Sheet button | Click this button to view a blank score sheet that can then be printed for use to manually record results of a class. |
| Other Class Reports | You can use this section to view reports from a previously judged class. ("vu ss [class#]" or "vu pl [class#]" from the command line). |
| Class Number | Enter the class number for the previously judged class. |
| Score Sheet option | Select this option if you want to view the score sheet. |
| Placings option | Select this option if you want to view the placings report. |
| View button | Click this button to view the selected report. |

Here is guidance on entering jump results. The main thing to know is that
you should use the Enter key to record jump results. For a clean jump,
just press the Enter key and
you'll be tabbed to the next jump field in the grid. To indicate a refusal at any
jump, press the Ctrl or period key and a 4. The 4 will be colored red
and enclosed in parentheses
to indicate that a refusal occurred.
The following single character codes are used to represent a particular
event:
E = Elimination
F = Fall
R = Retire
D = Displacement
(a time penaltly value (based on Settings) will be entered for you in the Time Penalty field)
Here is a list of example results that may occur at a single jumping
effort. The list shows how to enter the result and how it is recorded in
JJD.
| Results at a Single Effort | Entered as | Recorded as |
|---|---|---|
| clean jump | <Enter key> | - |
| rail down | 4 | 4 |
| refusal | 4 | (4) |
| refusal followed by rail down | 44 | (4)4 |
| refusal with displacement | 4D | (4)D |
| second refusal at the same effort | 4E | (4)E |
| second refusal on course | E | E |
| third refusal at the same effort in 4-5yo class | 8E | (8)E |
| third refusal on course in 4-5yo class | E | E |
| refusal followed by retire | 4R | (4)R |
| two refusals followed by retire in a 4-5yo class | 8R | (8)R |
| rail down twice at same jump (re-jump after refusal in combination) | 44 or 4 4 | 4 4 |
| fall of horse or rider | F | F |
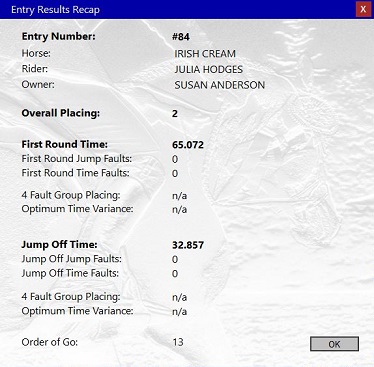
If you have the Display Results Recap option checked on the Settings panel, the Entry Results Recap screen will be shown when you click the Record / Save button on the Judge panel. This screen presents a recap of the round you just judged. It also includes placing in the 4 fault group and optimum time variance.

At the bottom of the JJD window, your top three entries are always displayed. The horse name, entry number, first round time and faults, jump-off time and faults and rider name are shown.
Here is the list of commands that you can use at the JJD command line. Each command can be abbreviated so you can type the full command or the abbreviation. Some commands require additional information (parameters) that you must enter. Some commands accept an optional class number parameter so if you don't supply a class number, the command will be executed against the current class being judged in JJD. Examples for the more complex commands are shown in the Purpose column. Click here to watch the related instructional video.
NOTE: Alt-spacebar will get you quickly to the command line at any time while using JJD.
| Command | Abbreviation | Parameters | Purpose |
|---|---|---|---|
| x | x | Exits/closes JJD |
|
| add | ad | [entry number] ["rider name"] |
Adds a horse/rider to
the current class Example: >ad 342 "Breanna Jenson" (adds #342 with rider Breanna Jenson) |
| aot | aot | [first round opt time] [jump-off opt time] |
Sets class specs for
Argentine optimum time so that time faults are not assessed Example: >aot 65 (sets first round opt time to 65 >aot 67 42 (sets first round and jump-off opt times to 67 and 42) |
| champ | chm | ["division name"] [class numbers] |
Opens the chanpionships
dialog Example: >chm "Children's Jumpers" 102 103 255 257 409 |
| chhorse | ch | [entry number] ["horse name"] |
Changes the horse for
an entry in the current class Example: >ch 933 "Charisma Z" (changes horse to Charisma Z for entry #933) |
| chrider | cr | [entry number] ["rider name"] |
Changes the rider for
an entry number in the current class Example: >cr 87 "Joe Carson" (changes rider to Joe Carson for entry #87) |
| color | co | [color ID] | Change the color scheme Examples: >co blu (changes color scheme to blue) >co gr (changes color scheme to green) >co pu (changes color scheme to purple) >co or (changes color scheme to orange) >co go (changes color scheme to gold) >co bla (changes color scheme to black) >co cy (changes color scheme to cyan) |
| copy | cp | [class number] ["class name"] [fence height] [card number] |
Copies the current
class specs to another class Example: >cp 321 "Low Children's Jumpers" .90 3 |
| edit | ed | Opens the entry information file to edit | |
| em | Prepares to send the class results email to your recipients | ||
| final | fi | Opens the dialog to
finalize current class |
|
| goto | go | [panel ID] | Goes to the specified
panel Examples: >go sp (goes to Specs panel) >go ju (goes to Judge panel) >go st (goes to Standings panel) >go re (goes to Reports panel) >go se (goes to Settings screen) |
| help | he | Opens the JJD help file
in your browser |
|
| open | op | [class number] | Opens JJD file for
specified class Example: >op 201 (opens JJD file for class 201) |
| pastefrom | pf | [class number] | Paste specs from
specified class that you previously set up in JJD Example: >pf 115 (pastes specs from class 115) |
| post | po | ss [class number] pl [class number] |
Post the scoresheet to web Posts the placings report to the web Examples: >po ss 201 (posts scoresheet for class 201 to web) >po pl (posts placings for current class to web) |
| prep | pr | Preps JJD for the next class |
|
| recall | re | [entry number] | Recalls an entry to update Example: >re 1027 (recalls data for entry 1027) |
| rulebook | rb | Opens the rulebook PDF file |
|
| save | sa | Saves the class
specifications to the class file NOTE: To be used when pre-setting cards before the show starts to save time when the show is in progress |
|
| score | sb | Opens the scoreboard screen | |
| set | set | fr dc tc jo |
Sets the jump numbers grid Examples: >set fr 1 10 dc 3 tc 8 jo 1 2 3a 3b 11 9 10 >set fr 1 10 dc 6 jo 1 2 5 6a 6b 9 10 >set fr 1 10 dc 3 7 >set fr 1 12 dc 4 tc 8 fr designates first round jumps x through x dc designates double combinations tc designates triple combinations jo designates the jump-off jump numbers |
| stagger | st | Opens the stagger
viewer window |
|
| switch | sw | [card number] | Switch to another card that is open in JJD |
| view | vu | ss [class number] pl [class number] |
Views the scoresheet report in browser Views the placings report in browser Examples: >vu ss 431 (view scoresheet for class 431) >vu pl (view placings for current class) |
| web | web | Opens the web results page |
|
| withdraw | wd | [entry number] | Marks an entry as
withdrawn/scratched from current class Example: >wd 922 (marks entry# 922 as withdrawn) |
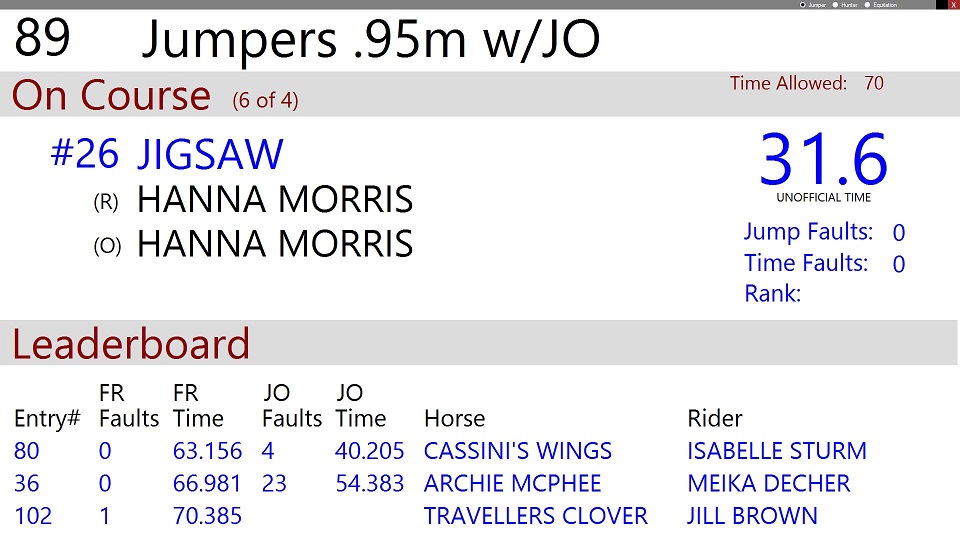
The scoreboard screen is designed to be used when a large, second monitor is hooked up to your computer. The screen layout as a 16:9 ratio with a size of 1920x1080. The screen shows the horse and rider on course, jump faults, time faults and rank when the entry completes their round. The top three entries in the class are also shown in the Leaderboard section at the bottom of the screen. You can open the scoreboard screen by clicking the View Scoreboard button on the Standings panel or by pressing Ctrl-F8 or by entering "sb" from the command line.
An alternative scoreboard with a simpler layout is also available to use. This alternative scoreboad does not show the Leaderboard info at the bottom of the page. To open the alternative scoreboard, hold down the Ctrl key when clicking the View Scoreboard button on the Standings panel.
If you happen to be using the scoreboard for a hunter or equitation class, you can specify the class type by selecting Hunter or Equitation at the top, right of the screen near the X. The will adjust the info layout of the scoreboard.
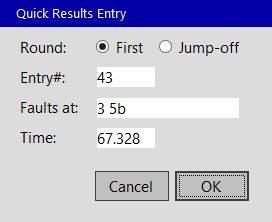
The Quick Results Entry (QRE) dialog can be used to record the results of a round quickly and may be most useful for a person using JJD that is responsible for capturing results compiled by the judge. Here are descriptions of the items on this panel.
| Item Name | Item Description |
|---|---|
| First Round option | Select this option if you're recording the first round results. |
| Jump-off option | Select this option if you're recording the jump-off results. |
| Entry# | Enter the exhibitor's entry number. |
| Faults at | Enter the jump numbers where faults occurred. Seperate multiple jump numbers with a space. |
| Time | Enter the time for the round. |
| Cancel button | Click this button to cancel out of the dialog. |
| OK button | Click this button to capture your data and return to the Judge panel where it can be recorded. |
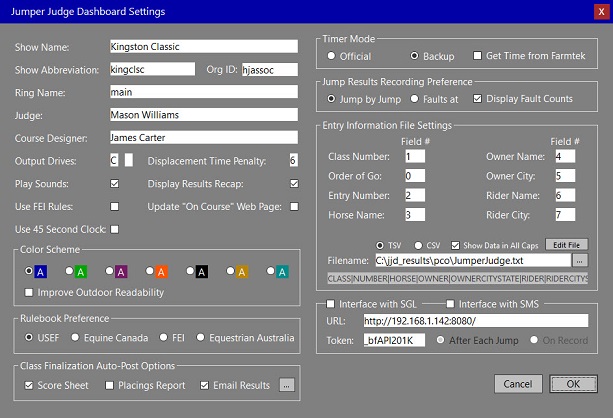
The Settings screen contains data that controls many aspects and behaviors of JJD. To access the Settings screen, click on the cog icon just under the X in the upper right-hand corner of the JJD screen as shown here.

Here are descriptions of the items on the Settings screen. Click here to watch the related instructional video.
| Item Name | Item Description |
|---|---|
| Show Name | Enter the number of the show. |
| Show Abbreviation | Enter an abbreviation for the show name (12 character limit). This data is used in naming the report files and in posting reports to the internet so you should set this value and not change it once you've started capturing class results. |
| Org ID | Enter the ID for the organization managing the show (used for grouping results on the web) |
| Ring Name | Enter the name of the ring you're judging at. |
| Judge | Enter your name or the judge's name if you're not the judge. |
| Course Designer | Enter the name of the course designer (optional). |
| Time Keeper | Enter the name of the time keeper (optional). |
| Output Drive(s) | Enter the drive letter(s) for where to save files. A second portable drive like a USB thumb drive is recommended, but not required. A folder named jjd_results will be created on the drive(s). |
| Displacement Time Penalty | Enter the number of seconds added for a displacement (default is 6) |
| Play Sounds | Select this option to hear sounds for various event indicators. |
| Display Results Recap | Select this option to show the entry recap dialog when you record or update entry results. |
| Use FEI Rules | Select this option to use FEI rules (Ex. 1 time penalty for every 4 seconds commenced past time allowed). |
| Update "On Course" Web Page | Select this option to upload live data to the "On Course" web page on equussentials.com |
| Use 45 Second Clock | Select this option to display and use the 45 second countdown clock. |
| Color Scheme | Select your preferred color scheme. Use a different color scheme when running multiple cards. |
| Improve Outdoor Readability | Select this option to improve the readability of the JJD screens in outdoor lighting situations |
| Timer Mode | |
| Official | Select this option if the built-in stopwatch in JJD will provide the official times. |
| Backup | Select this option if the built-in stopwatch in JJD will be used as the backup timer. |
| Get Time from Farmtek | Select this option if you will get the official time from the Farmtek Polaris timer. |
| Jump Results Recording Preference | |
| Jump by Jump | Select this option if you prefer to capture faults jump by jump. |
| Faults at | Select this option if you prefer to capture faults using the Faults at textbox. |
| Display Fault Counts | Select this option to have fault count totals for the class shown on the Judge panel under each jump in the jump grid |
| Entry Information File Settings | |
| Class Number Field # | Enter the field number for the class number. |
| Order of Go Field # | Enter the field number for the order of go number. |
| Entry Number Field # | Enter the field number for the entry number. |
| Horse Name Field # | Enter the field number for the horse name. |
| Owner Field # | Enter the field number for the owner name. |
| Owner City Field # | Enter the field number for the owner city. |
| Rider Field # | Enter the field number for the rider name. |
| Rider City Field# | Enter the field number for the rider city. |
| TSV | Select this option if the file is in tab-separated values format. |
| CSV | Select this option if the file is in comma-separated values format. |
| Show Data in All Caps | Select this option to show entry information data in all upper-case characters |
| Edit File button | Click this button to open the entry information file for editing ("ed" from the command line). |
| Filename | Enter the full path to the file or use the ... button to browse your computer. |
| ... button | Click this button to browse your computer to select the entry information file. |
| Rulebook Preference | |
| USEF | Select this option if you're at a show using USEF rules. |
| Equine Canada | Select this option if you're at a show using EC rules (the Use FEI Rules checkbox will be selected for you). |
| FEI | Select this option if you're at a show using FEI rules (the Use FEI Rules checkbox will be selected for you). |
| Equestrian Australia | Select this option if you're at a show using Australian rules (the Use FEI Rules checkbox will be selected for you). |
| Class Finalization Auto-Post Options | |
| Score Sheet | Select this option if you want to automatically post the score sheet to the web after finalizing a class.. |
| Placings Report | Select this option if you want to automatically post the placings report to the web after finalizing a class. |
| Email Results | Select this option if you want to automatically prepare the class results email for sending after finalizing a class. |
| ... button | Click this button to manage your email recipient list (see below). |
| Interface with SGL | Select this option if you want to interface with ShowGroundsLive (requires pre-show setup). |
| URL | Enter the URL to interface with SGL. |
| Token | Enter the token to interface with SGL. |
| After Each Jump | Select this option if you want to transmit jump-by-jump results to SGL. |
| On Record | Select this option if you want to transmit results to SGL when recording the completion of a round. |
| Interface with SMS | Select this option if you want to interface with ShowManagementSystem (requires pre-show setup). |
| URL | Enter the URL to interface with SMS. |
| Comp# | Enter the competition number as set in SMS. |
| OK button | Click this button to save your changes and close the dialog. |
| Cancel button | Click this button or press the Esc key to cancel your changes and close the dialog. |
Here are descriptions of the items on the email recipients list management screen.
| Item Name | Item Description |
|---|---|
| New Recipient | Enter an email address then click the Add button to add it to the list. |
| Add button | Click this button to add the new email address to the list. |
| Email Address list | This is your master list of email addresses. Check the checkbox when you want an address to receive the class results email. You can have many email addresses checked as desired. |
| Delete Selected button | Click this button to delete a selected/highlighted email address from the list. |
| Separator Character | Options for which character to use to separate multiple email addresses. This will depend on the email system on your PC. |
| Comma option | Select this option to have a comma used to separate email addresses. |
| Semicolon option | Select this option to have a semicolon used to separate email addresses. |
| Cancel button | Click this button to cancel all changes and close the dialog. |
| OK button | Click this button to save all changes and close the dialog. |
To access the About dialog, click on the question mark in the upper right-hand corner of the JJD screen, then select About.


The About dialog displays product information including version number. You can click on the version number to view a web page that describes the updates included in the release. You can also check for JJD updates from here and register your copy of JJD. You can also recover class data using the Data Recovery Options. Click here for more information.
Here are descriptions of the items on the About dialog.
| Item Name | Item Description |
|---|---|
| JJD Version Number | This is the version of JJD you are currently running. Click to open a web page to read about the recent updates to JJD. |
| Check for Updates button | Click this button to see if there are updates to JJD available for download. JJD checks for updates automatically every time you open JJD so you should rarely have to use this option. |
| Data Recovery Options | Check this option to recover data for a class. Click here for more information. |
| Product Code | The product code is displayed once your copy of JJD is registered. |
| Product Key | The product key is displayed once your copy of JJD is registered. |
| OK button | Click this button to close the dialog or press the Esc key. |
JJD has excellent support for running multiple cards simultaneously. If
the classes share the same jump course you can set your class specs, copy the specs to the
clipboard, then open another copy of JJD and paste in the class
specs. You then change the class number, name and card number.
Now you can just switch back and forth between the two
(or more) copies of JJD as
you judge the multiple classes. You can quickly switch by clicking the arrow
under the back button to slide out a list of the other open cards, then just
click on the card you want to switch to. It is also helpful to use different color
schemes on each instance of JJD as shown below. The color scheme can be selected on the
Settings dialog or you can use the "co" command
line option to quickly change your color scheme. Click
here to watch the
related instructional video.
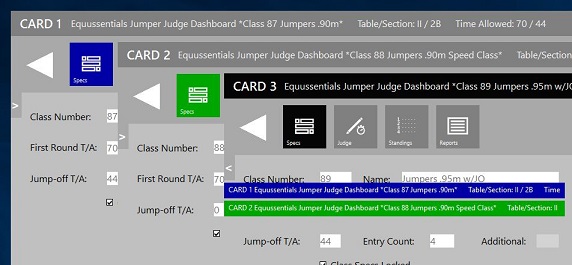
Tip: To open another instance of JJD in Windows 8 or 8.1, right-click the JJD tile on the Start menu, then select Open new window from the panel that comes up on the bottom of the screen.
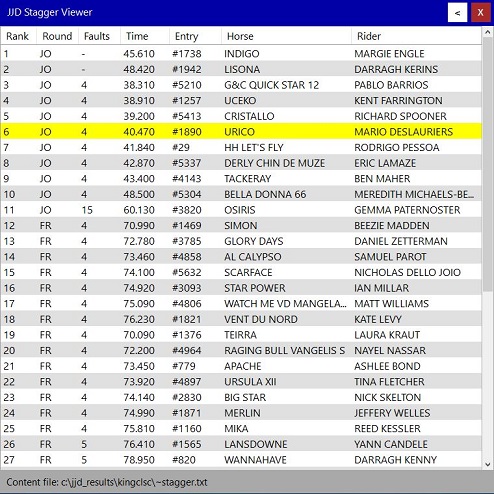
The stagger viewer is a separate window you can open by clicking the Open Stagger Viewer button on the Specs panel. You can position next to the main JJD window so that you always have full viewer to the stagger information. The windows opens in a narrow view as shown below, but can be expanded to include horse and rider by clicking the > button at the top. Click the button again to collapse the view back down. You can also double-click the title bar to expand and collapse the view. The last horse and rider to go are always highlighted.
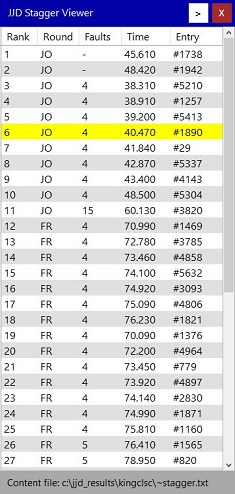 < collapsed view/expanded view
>
The user experience with JJD has been optimized for use of the number pad on your standard keyboard or with the use of a separate number pad when using a laptop that does not have a full sized keyboard. In addition to being the fastest way to enter round times, here are other things you can do using the Ctrl key (in most cases) in conjunction with a key on the number pad.
| Function | Keystrokes |
|---|---|
| Start Timer | Ctrl-1 or Page Up |
| Stop Timer | Ctrl-2 or Page Down |
| Pause Timer (when jump displaced) | Ctrl-3 or * |
| Split/Go Between Rounds (Power and Speed) | Ctrl-4 or / |
| Reset Timer | Ctrl-5 or Clear |
| Indicate Refusal at a Jump | Ctrl or . (period) |
| Record / Save Data for a Round | Ctrl-Enter |
If you've judged all the classes in a division using JJD, you can quickly calculate championship points for the division. Go to the Standings panel and click on the Championships button. In the dialog that appears, enter the division name and the numbers of the classes in the division. Put a space between each class number. Click the OK button and your championship results will be displayed. You can also use the "chm" command from the command line.
There are two basic file types that JJD creates - a .JJD text file to hold the judging details for each class, and .HTM files to hold the score sheet and placings report for each class. All files can be found in a folder named jjd_results on your computer's hard drive.
For each class you judge, the judging details will be saved in a file named <shownameabbr>_<yyyy>_Class<classnum>_Data.jjd where <shownameabbr> is the show name abbreviation established in the Settings dialog, <yyyy> is the current calendar year, and <classnum> is the class number. Here is a sample filename: kingclsc_2015_Class123_Data.jjd
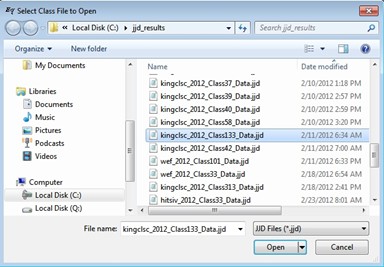
At anytime, you can open and load data from a previously judged class. Just click on the folder icon in the upper-righthand corner of the JJD screen as shown here.

A dialog will open that will let you navigate to the jjd_results folder on your computer's hard drive where you can select any .jjd file to open. You will then be given the option to open the file in a new copy of JJD.
For each class you judge, JJD creates two htm files in the jjd_results
folder on your computer's hard drive - one for the scoresheet and one for
the placings report. The filenames are
<shownameabbr>_<yyyy>_Class<classnum>_Scoresheet_Final_Report.htm
<shownameabbr>_<yyyy>_Class<classnum>_Placings_Final_Report.htm
where <shownameabbr> is the show name abbreviation (see
the Settings dialog), <yyyy> is the
current calendar year, and <classnum>
is the class number.
JJD can interface with Farmtek's Polaris timing unit so that exhibitor times can be fed directly into JJD. This feature requires the purchase of the USB interface cable from Farmtek.
After connecting the timing unit to your computer, click the Start Farmtek Reader button on the Specs panel. The Normal option for Timer Mode should be used and you should see a value in the COM Port field. Just click the Open Port button, then minimize the reader application.
Back in JJD, open the Settings screen and check Get Time from Farmtek. JJD will now receive times from the Farmtek Polaris timing equipment and will put the time in the appropriate time field in JJD.
Click here to watch the related instructional video.
JJD supports having the Farmtek brain running in normal mode or running time mode. Normal mode is when only the exhibitor's final round time is sent from the brain to JJD, whereas running time mode is where the running time is continuously sent to JJD. The running time mode should be used if you're using JJD's Scoreboard for displaying information on a big screen.
Here are the instructions for changing the Farmtek configuration.
JJD can be setup to interface with a file from a show management system to provide the judge information about each exhibitor including horse name, owner name, owner city/state, rider name, and rider city/state. The show management system must be able to export a simple data file with this information. The file must be in either tab-separated or comma-separated format and may include a headings line. The file can be a master list or can contain the class number to provide a class-specific entry list.
Here is an example of a tab-separated master data file that HorseShowtime show management software can export:
| Number | Horse | Owner | OwnerCityState | Rider | RiderCityState |
| 100 | Smooth Criminal | Chelsea Crabb | Woodinville WA | Katherine Wade-Easley | Woodinville WA |
| 101 | Musketeer | Blue Meadows LLC | Bainbridge Island WA | Kaylee Cox | Bainbridge Island WA |
| 102 | Lenamore Cavalier | Blue Meadows LLC | Bainbridge Island WA | Leslie Cox | Bainbridge Island WA |
| 102 | Lenamore Cavalier | Blue Meadows LLC | Bainbridge Island WA | Tara Niculescu | Lake Oswego OR |
| 103 | Apache Joe | Oz Investments | Canby OR | Jeff Campf | Canby OR |
| 104 | Contendra | Samantha Ortman | Brush Prairie WA | Jeff Campf | Canby OR |
| 104 | Contendra | Samantha Ortman | Brush Prairie WA | Samantha Ortman | Brush Prairie WA |
| 105 | Legatus | Merlin & Associates LLC | Portland OR | Shelley Campf | Canby OR |
| 106 | Wiberra | Merlin & Associates LLC | Portland OR | Jeff Campf | Canby OR |
| 107 | Greyscale | Maggie Dennis | Seattle WA | Maggie Dennis | Seattle WA |
| 107 | Greyscale | Maggie Dennis | Seattle WA | Shelley Campf | Canby OR |
As you can see with entry 102 above, if a horse has more than one rider, the data file can contain a line for each rider. If the file contains class number, then you will not see duplicate entries when the information is displayed in JJD.
Once you have the data file stored on your computer, use the Settings screen to setup the interface to the file. Now when you put in an entry number on the Judge panel, the associated exhibitor information will be displayed to you.
JJD includes special capabilities to interface with ShowGroundsLive and ShowManagementSystem so that a data file is not necessary.
Click here to view the related instructional video. As you'll see in the video, a file can be created using the Export/Jumper Judge option in HorseShowtime.
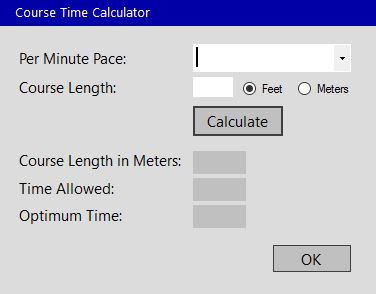
JJD provides a utility that will help the judge and course designer come up with a value for the time allowed over a given course. You can access the Course Time Calculator from the Help menu. Here are descriptions of the items on this dialog.
| Item Name | Item Description |
|---|---|
| Per Minute Pace | Enter the number for the class to be judged. |
| Course Length | Enter the length of the course in feet or meters. |
| Calculate button | Click this button to calculate the results. |
| Course Length in Meters | This is the calculated length of the course in meters. |
| Time Allowed | This is the calculated time allowed. |
| Optimum Time | This is the calculated optimum time for a table IV class. |
| OK button | Click this button or press the Esc key to close the dialog. |
Equussentials offers free internet hosting of class results that are compiled using JJD.
You can post the placings report and/or the scoresheet for each class. You
must have internet access from the judge's booth to use this feature.
When you post to the internet, your results will be available at:
http://www.equussentials.com/external/<OrgID>/<ShowNameAbbr>/<year>results.php
where <OrgID> is the organization ID and <ShowNameAbbr> is the show name abbreviation values that you entered on the
Settings dialog and <year> is the
current year.
Click
here for an example of what you will see. Click here to
watch the related instructional video.
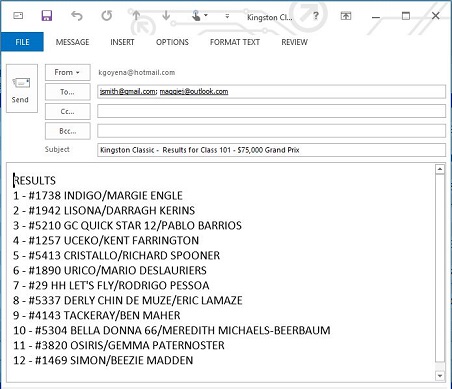
After you finalize a class, you can email class results to a list of recipients. You maintain a list of email addresses from the Settings dialog and specify which in the list should receive the class results email. That way, you can keep a master list but only activate those based on the show and/or ring you're working. Think about how helpful it will be to email results to the back gate person or even the show office. This feature requires internet access from the judge's booth. You should also have your email application up and running so that results will be sent as soon as you click the Send button.
To create the class results email, click the Email Results... button on the Standings pane or enter "em" at the command line. You can also have JJD automatically prepare the email after you finalize a class by selecting the Email Results option on the Settings panel.
JJD comes with some test data that you can load up and play with to practice using the application. To load the test data, start JJD then double-click the words "Class Number:" at the top-left of the Specs panel. You can now add new results, update existing data, view reports, etc.
In the rare event of a computer failure while you're judging a class, JJD has you covered with multiple ways to recover class results data.
The first method involves you using a thumb drive as a secondary backup. Insert a thumb drive into a USB port on your computer, then go to the Settings panel and enter the drive letter assigned to the thumb drive as one of the Output Drives. Every time you save/record data in JJD, the score sheet and placings reports will be written to both the drives you specify. So if your computer fails, you can open and print one or both reports from the thumb drive.
The second method does not involve a computer failure but can be used in the event that you accidently overwrote data for a class. JJD writes data to a log file as you judge rounds. Class data can be recovered from the log file by opening the
About dialog and checking the Data Recovery Options checkbox. Enter the class number then click the
Recover Data button and select the log file to search (log
files are created daily). JJD will find all entries for the class in the
selected log file and will write the data out to a .JJD file with "RECOVERY"
in the filename.
Now use the Open File dialog to open the recovery file.
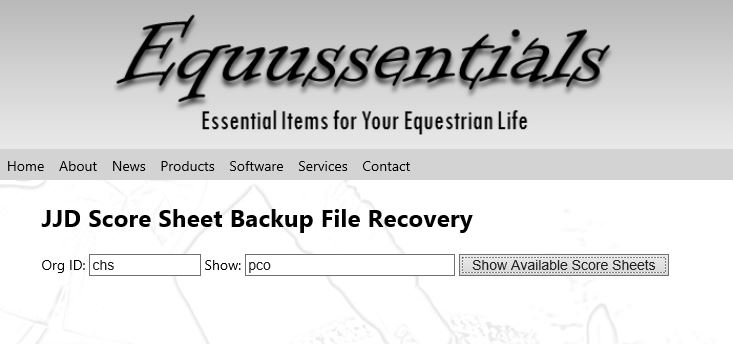
The third recovery method involves using the automatic backup feature of JJD to recover a score sheet from the web. This requires that you have internet access from the judges booth while using JJD. When internet access is available, JJD will automatically copy the class score sheet to the cloud every time your save/record data. So if your computer fails, you can go to http://www.equussentials.com/backuprecovery.html, enter the org ID and show abbreviation as set in the Settings panel, then select a class to display and print the score sheet. There is also a link from the Equussentials home page to access the Backup Recovery page. To try out the recovery process, go to the Score Sheet Backup File Recovery page, enter Org ID "chs" and Show "pco" then click the Show Available Score Sheets button (see samples below).
Here is the JJD Score Sheet Backup File Recovery page where you enter the Org ID and Show to have a list generated of all available class score sheets.
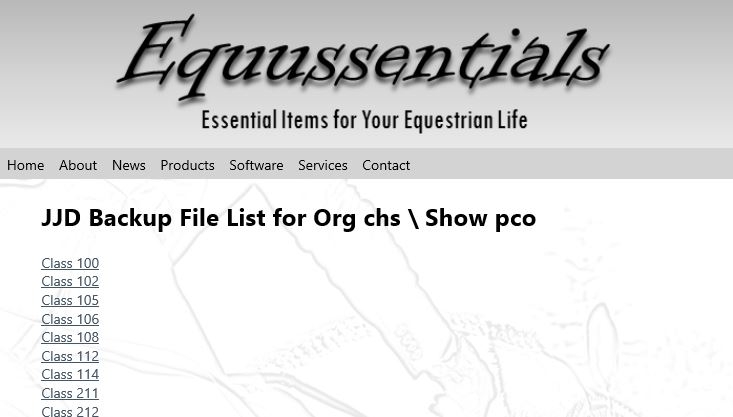
Here is a sample page showing links to the class score sheets.
